3d software psdto3d
It can convert the ordinary image to the attractive 3d image.
There are some trait about it:
1. By moving psd file on level to make 3d image.
2. Drawing the path on the single layer can chang to 3d image.
3. 3d images and 2d images could be mixed together for making a new image.
4. Support the large image in-outputting.The outputing file can reach to 40GB,the
sum of angle can reach to 99.
5. We can adjust the outputting size and DPI,compress on vertical.
6. The parameter is optimized,we can save compelete,amend convenient.
7. Simplify the whole preview button,we need't to preview every drawing layer
prior.
8. Supports to piece many 3d images together,the median lines auto be in order.
9. Supports VISTA.
10. Supports the CMYK ,and the PSD outputing.When we make 3d printing image,
the color format does't need to alter.
| File
|
||
| Import*.psd |
Import PSD file。support the psd file of RGB、CMYK fomat,the
psd file don't contain mask layer and locked layer.
|
|
| Edit
|
||
| Begin draw line Undo Delete line Delete layer Delete Al |
Start
draw line
|
|
| View | ||
| Zoom in |
Zoom
in the images |
|
| Help
|
||
| Help About http://www.ppoo.com/ |
Help
file The software message Go to our company's website |
|
Introduce
Toolbar
1. toolbar:
2.the
function of the button:
Introduce
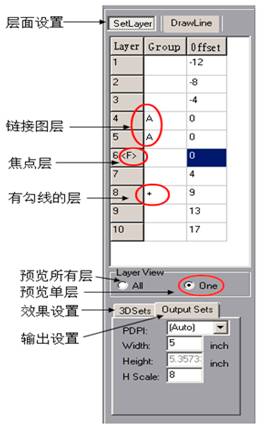
Parameter Plate
2. there
are tow "A" in the 4th and 5th layer,that
is saying the 4th and 5th layer was linked in the psd file,these tow
layers is'n be drawed line,they will appear alternate.
3. there have “+”show this layer was drawed line. 4. the nubmer "0" of the shift parameter plate“Offset”,it shows this layer will not protrude,the negative shows the layer will protrude,the positive number shows the layer will concave,when the psd file was imported,the parameter will be showed by system,user can amend by yourself.
5. the
"6<F>" at the left image,it expresses this layer is
focus layer.The focus layer will not shift,the
parameter can be setted in "【3D Sets】--【Layer 0】".
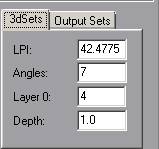
3dSets:
Angles:The
number of lens. numerical
range is between 2~99.
Layer 0:The
sequence number of focus layers.Whe we preview the 3d layer in animation,this
layer will not change the displacement.The numbe in the input field
express the layer number which is setting currently.
Depth:The
zoom in multiple of depth,example chang "1" to "1.5",it means zoom out
the depth to a half.If change "1" to "3",it means zoom in the depth
three times.
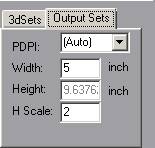
Width:The
width of output.
Height:The
H Scale:Compress
the precision of image vertical."2" means 2 times.
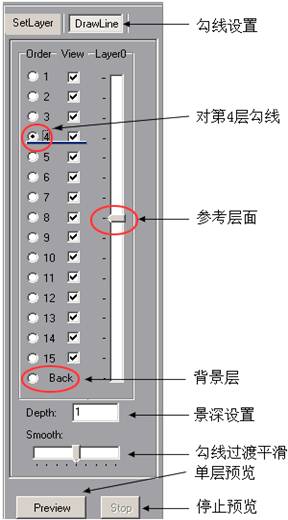
6. At
the down
left image,the number "1"----"15"
show there are 15 draw line layers,which was set.
7. The
left image shows it can start drawe line."Depth" means zoom in the times
of the layer,which show the quantity of displacement on level.Numerical
range is between
0.1~999.
Order:Show
the layer which we are drawing,"1"
means the
distance is near to us,"15" means the distance is far from us.We are
supposed to estimate the every drawing lines by our space sense.
Back:It
is the background layer.
Depth:The
zoom in multiple of depth,example chang "1" to "1.5",it means zoom out
the depth to a half.If change "1" to "3",it means zoom in the depth
three times.
Smooth:Regulate
smooth of the fold line.The left numerical value is 0,the right is great.
Preview:Preview
the single layer.
Stop:Stop
preview.
|
 View
View